
How to Install MyBB on Cloud9 IDE
![]()
MyBB is a free and open source community CMS (similar to phpBB we’ve covered before), you can use it to create an online community/forum for your hobby, school or sports team. As with many content management systems, you don’t have to know any programming language to start and manage your portal.
This post will present a step by step guide on how to install MyBB for free on Cloud9 for development purposes, please note that it’s not advisable to install a Production version of MyBB on Cloud9 as the free tier isn’t designed for that intended purpose. Now, and without further ado let’s dive into the tutorial.
Prerequisite
First, you’ll need to sign-up for the free version of Cloud9.

Installation
Step One
After signing up and confirming your email, you’ll be directed to your dashboard, just click on the “create a new workspace” tab.

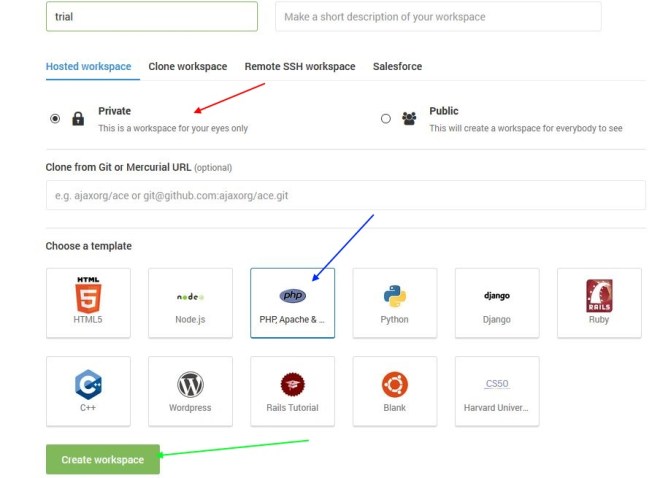
Step Two
You’ll be directed to a new window where you should configure your workspace, select the “php” option and then create the workspace.
Step Three
You’ll then be directed to your workspace, in the terminal just clone the latest release of MyBB (you can find the latest release on this link) using “wget”, at the time of writing this post the command should be as follow;
wget https://resources.mybb.com/downloads/mybb_1812.zip
Step Four
After the download is complete, we’ve to unzip the downloaded file using the following command;
unzip mybb*
Step Five
Now you need to move all of the content of the unzipped folder to the main directory, in my case move the content from “upload” to “trial”.

Step Six
After the unzip is complete just click on the “Run Project” arrow, then click on “Preview”, the installation window will appear in a browser-like window on the side of your screen.

Step Seven
In the first step of the installation wizard you’ll be greeted with the welcome window, just hit the ‘Next” tab.

Step Eight
In the next step, there’s the license of agreement, just hit the “Next” tab.

Step Nine
In the following step, the installation will check for the installation pre-requisites.

Step Ten
In the following step, you should enter the database credentials, use the ones in the screenshot below; Database Server “0.0.0.0”, Login “root”, Database Name “c9”. Then you shall be directed to a new window that will inform you that a database table was created successfully.

Step Eleven
In the following step, the database table will be populated, just hit the “Next” tab.

Step Twelve
In the following step, the theme will be installed, just hit the “Next” tab.

Step Thirteen
In this step, you’ll create the portal name and have a link to the portal, and the location where cookies are stored just set the portal name and hit the “Next” tab.

Step Fourteen
In the final step, you should create your admin username and password.

Step Fifteen
You’ll then be directed to the installation confirmation page, just select whether you want to log into your admin panel or the frontend.

Finally, you’ll be directed to your portal.

Congratulations, now you have a fully functional installation of MyBB on Cloud9, as it’s been advised above this installation should be for development purposes only and not for production.