
How to Deploy FreshRSS on OpenShift
![]()
We’ve covered alternatives for Google Feedburner and Feedly in a previous post using Tint Tiny RSS on OpenShift, this post will present another alternative which is FreshRSS and we’re going to deploy it on OpenShift.
This post is a step by step guide on how to deploy FreshRSS which is a self-hosted (you can deploy it on your own server) RSS feed reader on OpenShift for free. Now, and without further ado let’s jump into the tutorial.
Requirements
- A free OpenShift account, just go to OpenShift website and register using your email, no credit card is required.


Steps
- After registering; go to OpenShift home page and click on the “MY APPS” on the top of the screen.

- You’ll be directed to your login window and enter your credentials, and then you’ll be directed to a new window click on the blue “Create your first application now” link.

- You’ll be directed to the next window, type “PHP, MySQL” in the search field, and select the application shown below in the screenshot.

- You’ll be directed to the next window, in the public URL; type the name of the project/application name (e.g. FreshRSS, MyRSS, etc.) in the first space and the domain name (it’s not your real domain name, just any identification name e.g. NickName, YourName) in the second space.

- Under the public URL, there’s the source code slot, just copy and paste the following link “https://github.com/FreshRSS/FreshRSS.git”
- Leave everything as it’s and click on the “Create Application” tab at the end of the page.

- You shall be directed to a new window where you shall find all of your “MySQL” credentials.

- You’ll be directed to the main window again and it’s time to go to your “portal” and start the installation process, to do that simply click on the blue link at the top of the screen (that’s your URL).

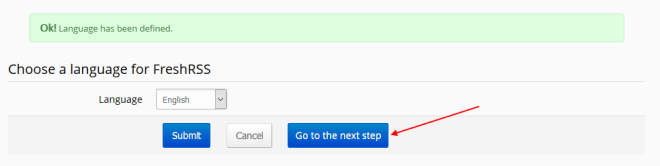
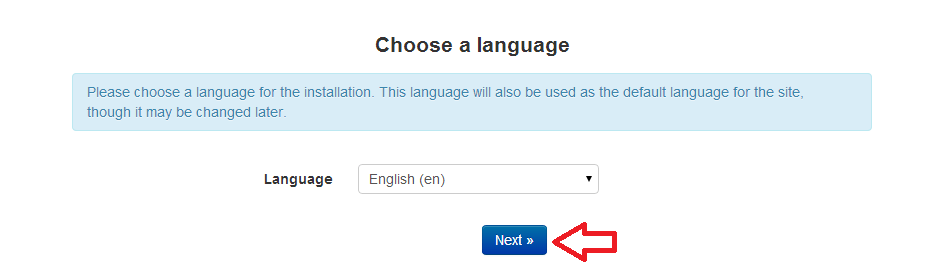
- You’ll be directed to the “FreshRSS” installation window, the first window will be the language selection just select the language and click on the “Go to the next step” tab.
- You’ll be directed to the next window, where the installer will check for the installation requirements, just click on the “Go to the next step” tab.

- You’ll be directed to the next window, where you should enter your admin/login username and password, don’t forget to create a strong password and write it down or even better use a password manager to generate and store strong passwords.

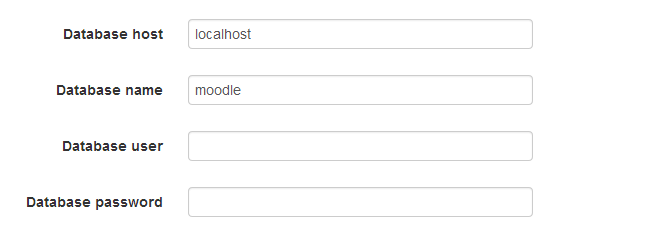
- You’ll then be directed to the next window, where you should enter some information like “database username, database password, host”, you can get this information from step “7”, you’ll also have to create and fill your login admin password.
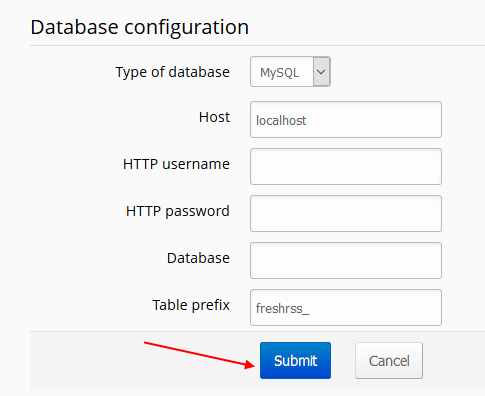
- In that window, you should provide your database credentials, there’s a small trick here which is getting your database Host server, the easiest way to do so is to return to your application (the main window where your shall find your database credentials) and click on the small arrow at the phpMyAdmin tab.

- A new window will popup just copy the number shown in the below screenshot.
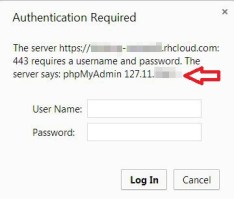
- Paste that number in the database host field in the FeshRSS installation, then fill in the rest of the information from your database credentials that you can find in your application.
- You’ll then be directed to the next window where you shall find the congratulation message for finishing the installation, just click on the “Complete installation” tab.

- You’ll be then directed to the login window, type in the username and password you’ve created in step 11.

- Now, to add a feed, just click on the message in the main window that says “You may add some feeds”.

- You’ll then be directed to a new window, just add the RSS link in the empty field and click on the plus “+” sign and voila, the feed is added.


Congratulations, you’ve now deployed your own feed manager on OpenShift and added your first RSS feed.