
How to Install Jirafeau on OpenShift
![]()
Jirafeau is a free and open source file sharing application, Jirafeau allows you to share files (just like Dropbox, OneDrive, Google Drive, etc.) but what is unique about it is it allows you to set download and time limit for the shared file i.e. the presentation could be downloaded only one time in the following hour after that the file is gone for good, Jirafeau is also self-hosted which is great if you’re security conscious and you don’t want commercial services to have access to your data.
This guide will present a step by step tutorial on how to install Jirafeau on OpenShift, the only skill you’ll need during the tutorial is your ability to use a web browser.
Requirements
- A free OpenShift account, just go to OpenShift website and register using your email, no credit card is required.


Steps
- After registering; go to OpenShift home page and click on the “MY APPS” on the top of the screen.

- You’ll be directed to your login window where you should enter your credentials, you’ll be directed to a new window, just click on the blue “Create your first application now” link.

- You’ll be directed to another window, type “PHP” in the search field, and select the application PHP 5.4 as shown below in the screenshot.

- You’ll be directed to another window, in the public URL; type the name of the project/application name (e.g. MyFiles, ShareFile, etc.) in the first space and the domain name (it’s not your real domain name, just any identification name e.g. NickName, YourName) in the second field.

- Under the public URL, there’s the source code field, just copy and paste the following link “https://gitlab.com/mojo42/Jirafeau.git”.

- Leave everything as it’s and click on the “Create Application” tab at the end of the page.

- You’ll be directed to the main window and it’s time to go to your “portal” and start the installation process, to do that simply click on the blue link at the top of the screen (that’s your URL).

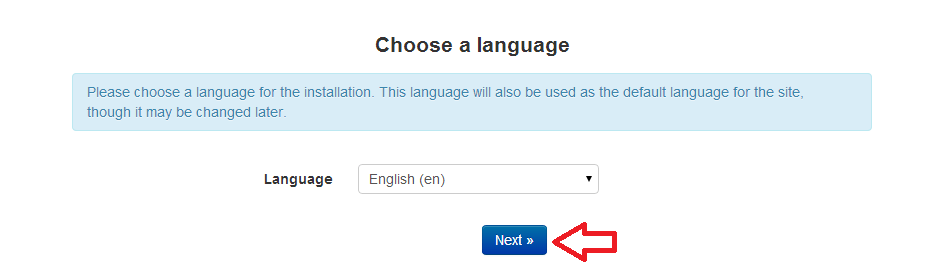
- You’ll be directed to the “Jirafeau” installation window, in the first window will select the language and then hit the “Next Step” Tab.

- You’ll be directed to another window, where you should create your admin password, create a strong password and then click on the “Nest Step” tab.

- You’ll then be directed to another window which will give you the link to your portal (you already know it from step 7) and the data directory, just hit the “Nest Step” tab.

- You’ll then be directed to the final window, just click on the link at the bottom of the window.

- Finally, you’ll be directed to the front end of your portal, to upload files, simply click on the file icon.

- To log-into your administraor panel, type the URL to your portal then “/admin.php” i.e “http://jir.rhcloud.com/admin.php”, don’t forget the “.php” at the end. You’ll be directed to the log-in window, just use the admin password you’ve created in step 9.

- You’ll be then directed to your admin panel, where you can have full control over the portal and the files uploaded.


Congratulations, now you have a fully functional file hosting solution running for free on OpenShift.