
How to Install TeamPass on Cloud9 IDE
![]()
Password managers are one of the most important applications/software nowadays where nearly everything is online; from banking and shopping to documents and CAD creation. So you need to have a strong and unique password for every service and that would have been impossible if it wasn’t for password managers which create and store strong unique passwords. TeamPass the password manager we’re going to cover in this post doesn’t only solve the problem of password creation and storage for personal usage but for teams too, as multiple team members might need access to some passwords but not all passwords.
This post will present a step by step guide on how to install TeamPass for free on Cloud9 for development purposes, please note that it’s not advisable to install a Production version of TeamPass on Cloud9 as the free tier isn’t designed for that intended purpose. Now, and without further ado let’s dive into the tutorial.
Prerequisite
First, you’ll need to sign-up for the free version of Cloud9.

Installation
Step One
After signing up and confirming your email, you’ll be directed to your dashboard, just click on the “create a new workspace” tab.

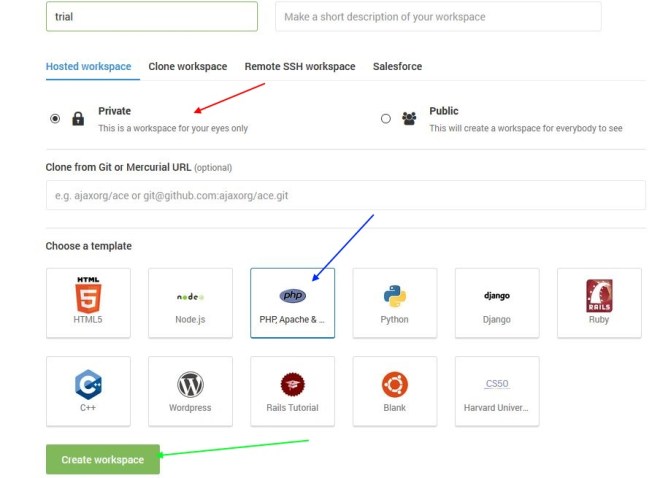
Step Two
You’ll be directed to a new window where you should configure your workspace, select the “php” option and then create the workspace.
Step Three
You’ll then be directed to your workspace, in the terminal just clone the latest release of TeamPass using “git clone”, at the time of writing this post the command should be as follow;
git clone https://github.com/nilsteampassnet/TeamPass.git
Step Four
Now you need to move all of the content of the downloaded folder to the main directory, in my case move the content from “TeamPass” to “trial”.

Step Five
After the unzip is complete just click on the “Run Project” arrow,then click on “Preview”, the installation window will appear in a browser-like window on the side of your screen.

Step Six
To prevent any problems during the installation HTTP and HTTPS conflict), just click on the pop-out icon in the browser-like window as seen below, and change the HTTPS to HTTP.

Step Seven
In the first installation window, just hit the “Next” tab.

Step Eight
In the next step, the installation will check for the pre-requites, click on the “Launch” then the “Next” tab.

Step Nine
In the following step, you should enter your database credentials, use the one in the screenshot below; host “0.0.0.0”, login “root”, database name “c9”.

Step Ten
In the following step, you should generate the SaltKey using the “Generate” tab , then create the administrator password that you’ll use to log in then hit the “Launch” tab.

Step Eleven
In the final step you’ll be directed to the final window of the installation process, just hit the “Start” tab and you’ll be directed to your login window, use admin in the username field and the password you’ve created in the above step.

Congratulations, now you have a fully functional installation of TeamPass on Cloud9, as it’s been advised above this installation should be for development purposes only and not for production.
