
How to Host a WordPress Website for Free on AWS (Amazon Linux)
![]()
The previous tip was a step by step tutorial on how to host a WordPress website for free for one year using Amazon Web Services (AWS) free tier windows servers; this tip will be a step by step guide on how to host a WordPress website for free for one year on AWS (Amazon Linux).
The reason why Amazon Linux would be a better choice to host a WordPress website than Windows is that Amazon Linux uses fewer resources (memory and processing power) leaving all of the resources available for the website and that would improve the performance of the website drastically; the only drawback for Amazon Linux is that you’ll need to enter some commands in the command prompt, but don’t worry every command required in the process will be provided and you’ll be shown how to do everything in great details, always remember; if you can use a web browser then you can follow along this tutorial, so without further ado let’s dive into this tip.
Ingredients:
- AWS free tier account; if you don’t have one visit Amazon; and click on the yellow tab seen below to start the registration process(warning: credit-card information is required to complete the registration process).

- You’ll need to download PuTTY and PuTTYgen.

Steps:
- Log into your AWS account, select the EC2 service from the services list.

- You’ll be then be directed to a new window; click on the blue (Launch Instance) tab.

- You’ll be directed to a new window where to choose an Amazon Machine Image (AMI), select the Amazon Linux (Amazon Linux AMI 2013.09.2 – ami-bba18dd2 ) as seen below.

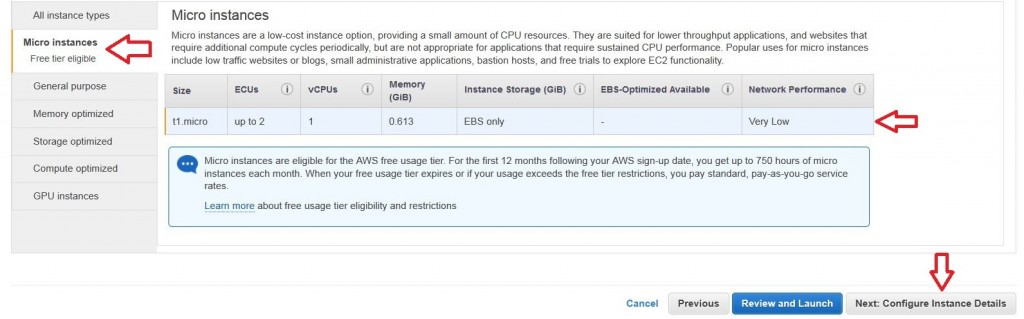
- Then you’ll directed to a new window to choose an Instance Type, select Micros Instance (t1.micro) and click on the grey “Next: configure instance details” tab not the blue “review and launch tab”.

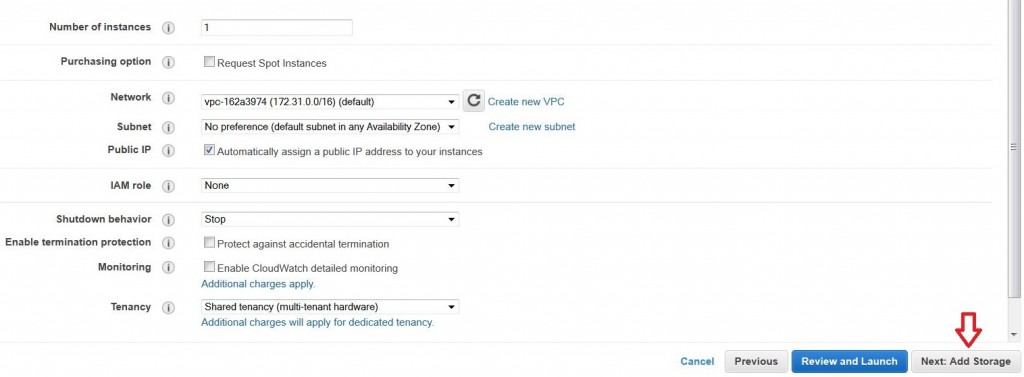
- Then you’ll be directed to the configure instance details window, leave everything as it’s and click on the grey “Add Storage” tab.

- You’ll then be directed to the add storage page, just leave everything as it’s and click on the grey “Tag Instance” tab.

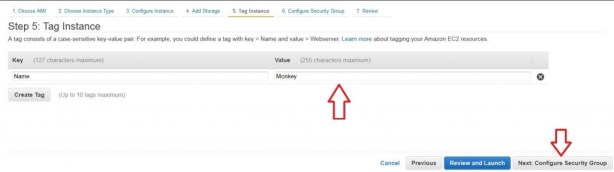
- You’ll then be directed to the tag instance page, just call the instance whatever you like (e.g. MyAwesomeWebsite) and then click on the grey “Next: Configure Security Group” tab.
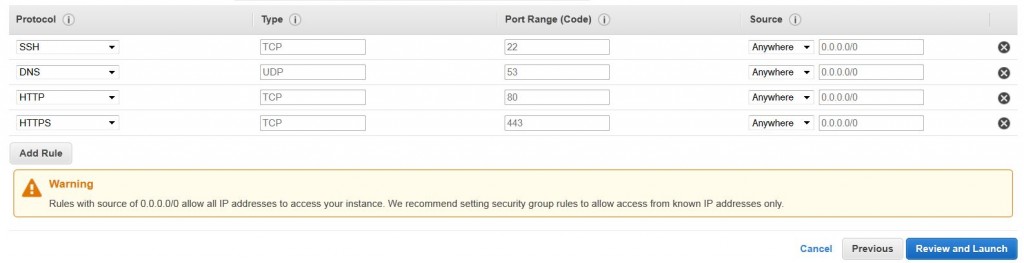
- You’ll then be directed to the configure security group page where you should add the following from the drop-down menu; HTTP (80), HTTPS (443) and DNS (53) and make sure that you select “anywhere” under the sources, after you finish the configuration menu it should look as the screenshot below, now click on the blue “review and launch” tab.

- You’ll then be directed to the review window where you should just click on the blue “launch” tab.

- When you click on the “launch” tab a new window will popup where you should create your “key pair” it’s just the key that will grant you access to your instance (virtual server). So select “create a new key pair” and call the key anything “e.g. MyAwesomeWebsite” and then click on the “Down key pair” tab and save it to your local computer (e.g. desktop), then click on the blue “Launch Instances” tab.

- You’ll then be directed to a new window where you should just click on the blue “view instances” tab.
- You’ll then be directed to your instance window, it’s worth noting that the instance will take some time to be initialized usually 5~15 minutes.
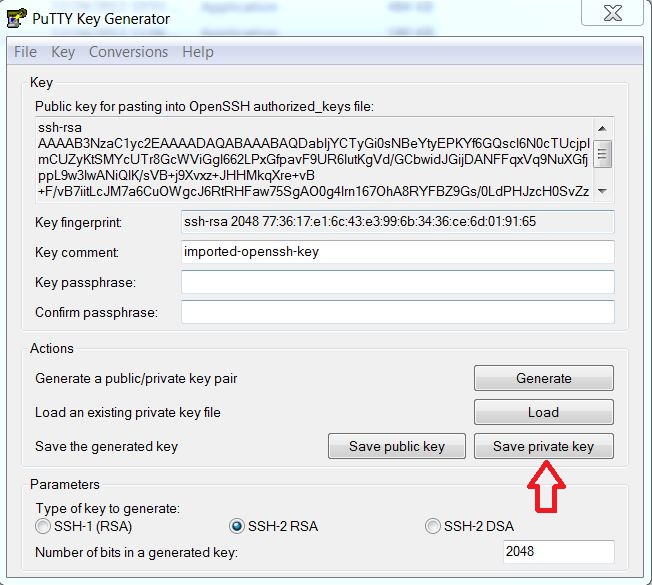
- Now, till the instance is initialized, open the PuTTYgen you’ve download previously, click on the load button and browse to the “key pair” downloaded in step 10, hint: select “all files” when browsing to find the “key pair”.

-
Click on the “save private key” that appeared after loading the “key pair” and save that key onto your local computer (e.g. desktop), a warning massage will appear just click on “ok”.

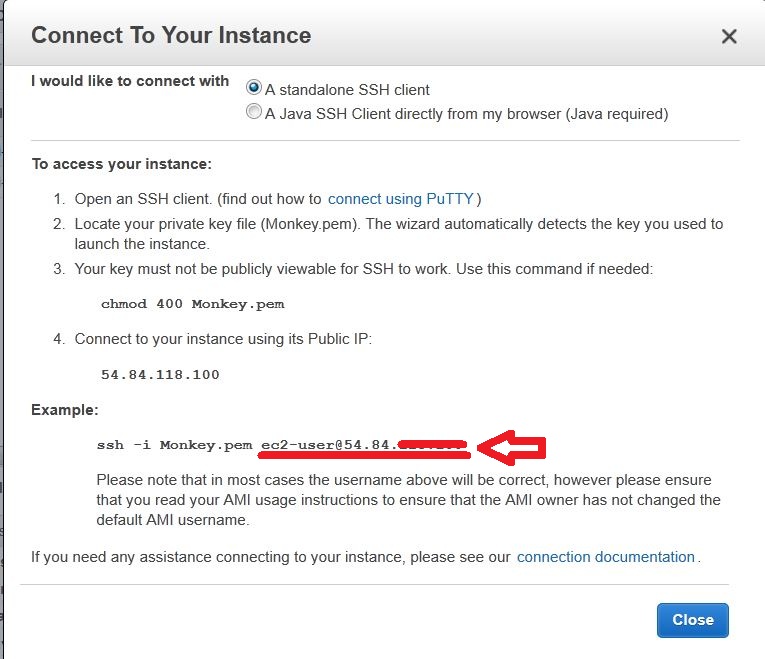
- After the initialization is complete, click on the grey “connect” at the top menu.

- New window will popup, just copy the address “ec2-user@54.84.xxx.xxx” as seen below.

-
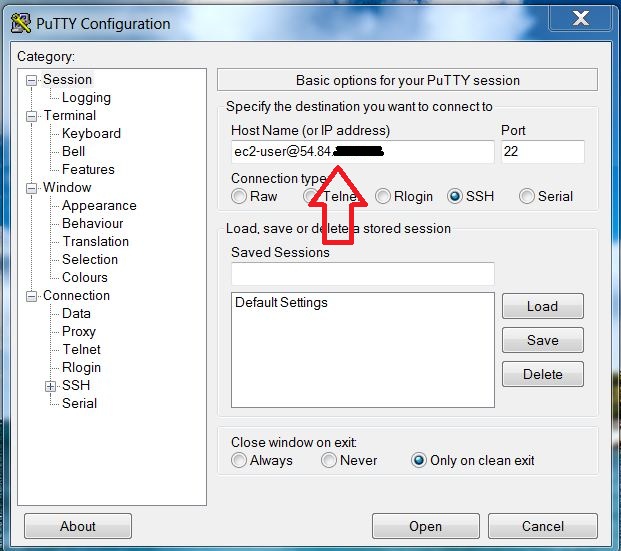
Now, open PuTTY that you’ve previously downloaded, and paste the address you’ve just copied in the “Host Name (IP Address)” bar as seen below.

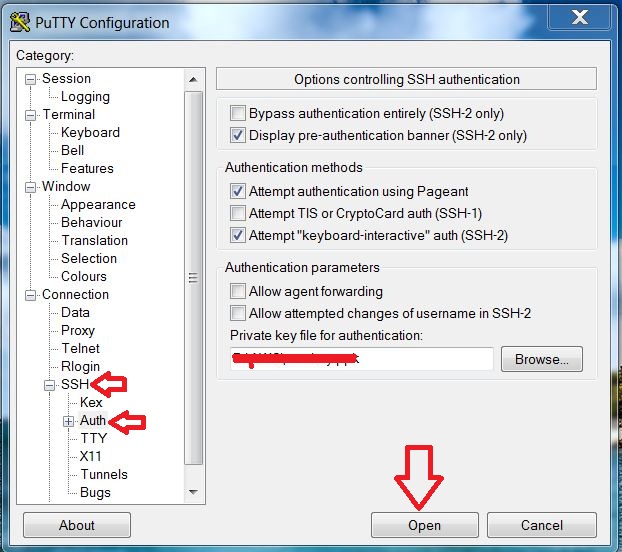
- Now, in the same window but at the side bar you shall find “SSH” click on it then click on the “Auth” in the sub-menu, then browse to the key you’ve created with the PuTTYgen in step “14”, then click open. You’ll then be prompted by a warning message, just click “Yes”.

-
Now you’re in your server console (terminal) and it should look like this:

- Now copy and paste the following line to update the system (to copy just select and copy, to paste just go to your terminal and right click) then hit “Enter”.


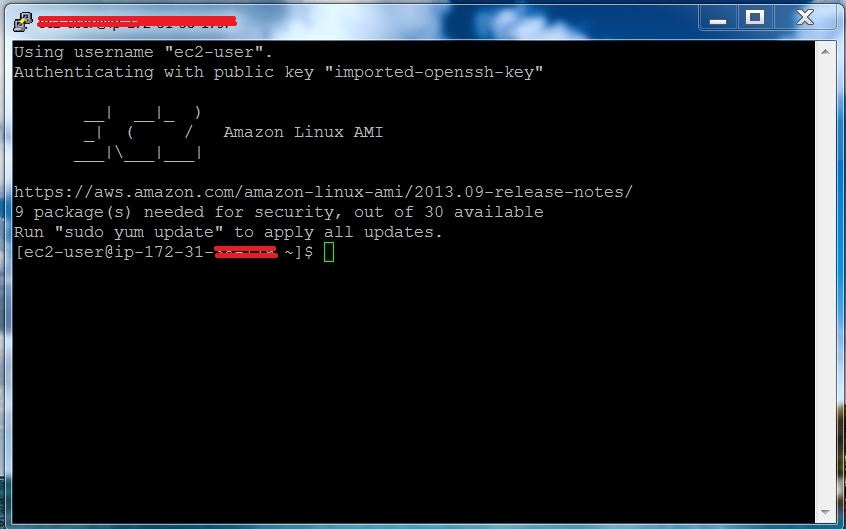
sudo yum update –y
- Now, you’ll install PHP, MySQL and the Apache server. After you get the complete message in the terminal copy and paste the following commands:
sudo yum groupinstall -y “Web Server” “MySQL Database” “PHP Support”
sudo yum install -y php-mysql
sudo service httpd start
sudo chkconfig httpd on
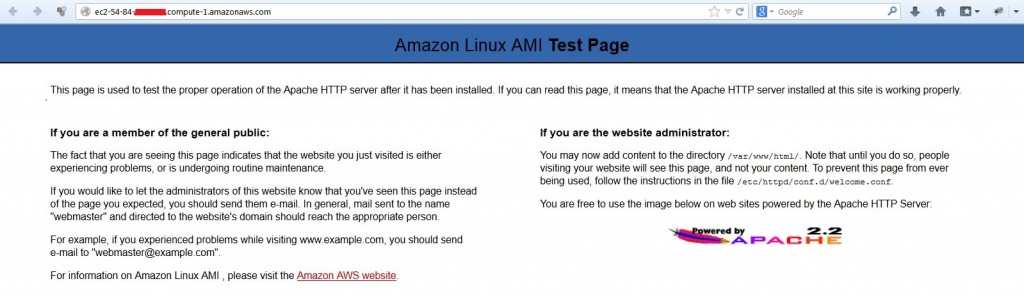
- To check that everything is fine just copy and paste your public IP (if you don’t know how to get your public IP jump to the next step) in your web browser and you should be prompted by the following window (if you can’t see this page then make sure that you’re configured the security group correctly as per step (8).

- To find your Public IP, go to your AWS console “the one in step 15” and you shall find it as seen below in the screenshot.

- Back to your terminal, copy and paste the following command:

ls -l /var/www
sudo groupadd www
sudo usermod -a -G www ec2-user
exit
- Your PuTTy connection should close, re-open putty and paste the same address again “ec2-user@54.84.xxx.xxx” in the host name “IP Address” bar, then go to the sub-menu SSH >> Auth and browse to your generated “key pair” then click open (in short repeat step 18). The terminal will open again.
- In the terminal copy and paste the following commands:
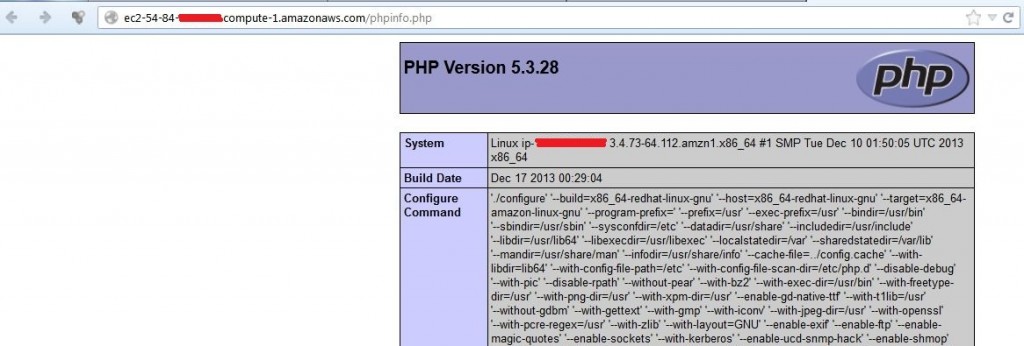
groupssudo chown -R root:www /var/wwwsudo chmod 2775 /var/wwwfind /var/www -type d -exec sudo chmod 2775 {} +find /var/www -type f -exec sudo chmod 0664 {} +echo "<?php phpinfo(); ?>" > /var/www/html/phpinfo.php- Now go to your web browser and type your Public DNS address/phpinfo.php (http://my.public.dns.amazonaws.com/phpinfo.php) if you don’t know where your public DNS address is; it’s the one above the Public IP address you’ve found in step (23) and you should be prompted by the following window.

- Now, return to your terminal and copy and paste the following commands:
rm /var/www/html/phpinfo.php
sudo service mysqld start
- You’ve now finished installing PHP, MySQL and the Apache server so it’s time to install WordPress, so copy and paste the following commands:
wget https://wordpress.org/latest.tar.gz
tar -xzf latest.tar.gz
ls
sudo service mysqld start
sudo mysql_secure_installation
- Now, you’ll be prompted by a massage asking you your root password, just hit enter (there’s no password for the root user), then you’ll be asked whether you want to enter a password type (Y), and enter a strong password and keep it in a safe place (piece of paper or notepad), you’ll then be asked 4 questions, just type (Y) in all of them.
- Now, WordPress is installed and you need to create a strong password for your MySQL, so copy and paste the following command:
sudo service mysqld start
mysql -u root -p
- You’ll be prompted to enter a password, enter the password you’ve created in step (30) and hit enter (if you face the famous 1045 (28000) error, then you’ve made a mistake in step (30) so you’ll need to repeat it); you’ll then use the following command to create a WordPress user name and password (of course replace wordpress-user in the command with your username and your_strong_password with a password of your choice, and keep them in a safe place):
CREATE USER ‘wordpress-user’@’localhost’ IDENTIFIED BY ‘your_strong_password’;
- Then you’ll need to create a database, so use the following command (again replace ‘wordpress-db’ with the name of your data base and keep it in a safe place):
CREATE DATABASE `wordpress-db`;
- Now give all of the privileges to the new database using the following command (replace ‘wordpress-db’ with your wordpress database name and the wordpress-user with your wordpress user, and keep them in a safe place):
GRANT ALL PRIVILEGES ON `wordpress-db`.* TO "wordpress-user"@"localhost";
- Flush the privileges using the following command:
FLUSH PRIVILEGES;
exit
- You’ll need to create and configure the wp-config file for WordPress, so use the following commands:
cd wordpress/cp wp-config-sample.php wp-config.phpnano wp-config.php
- After that command you shall find a window like the one below:

- Move down with your arrow keys till you reach (database_name_here, the one marked in red in the above screenshot) and replace it with your database name (step 32).
- Move down with your arrow keys till you reach (username_here, the one marked in yellow in the above screenshot) and replace it with your username (step 31).
- Move down with your arrow keys till you reach (password_here, the one marked in green in the above screenshot) and replace it with your database password (step 31).
- Now move with your arrow keys down again till you find the following window:

- You should replace the underlined value with strong random passwords as that adds a layer of security to your WordPress website, to generate these numbers just visit the following link (https://api.wordpress.org/secret-key/1.1/salt/) and copy and paste the values you’ll be prompted with.
- Just press on “Ctrl+x” to exit.
- Now you need to move all what you’ve installed to the root directory, so copy and paste the following commands:


mv * /var/www/html/
sudo usermod -a -G www apache
sudo chgrp -R www /var/www
sudo chmod 2775 /var/www
find /var/www -type d -exec sudo chmod 2775 {} +
find /var/www -type f -exec sudo chmod 0664 {} +
sudo service httpd restart
sudo chkconfig httpd on
sudo chkconfig mysqld on
sudo service mysqld status
sudo service httpd status
sudo service httpd start
yum list installed php php-mysql
sudo yum install -y php php-mysql
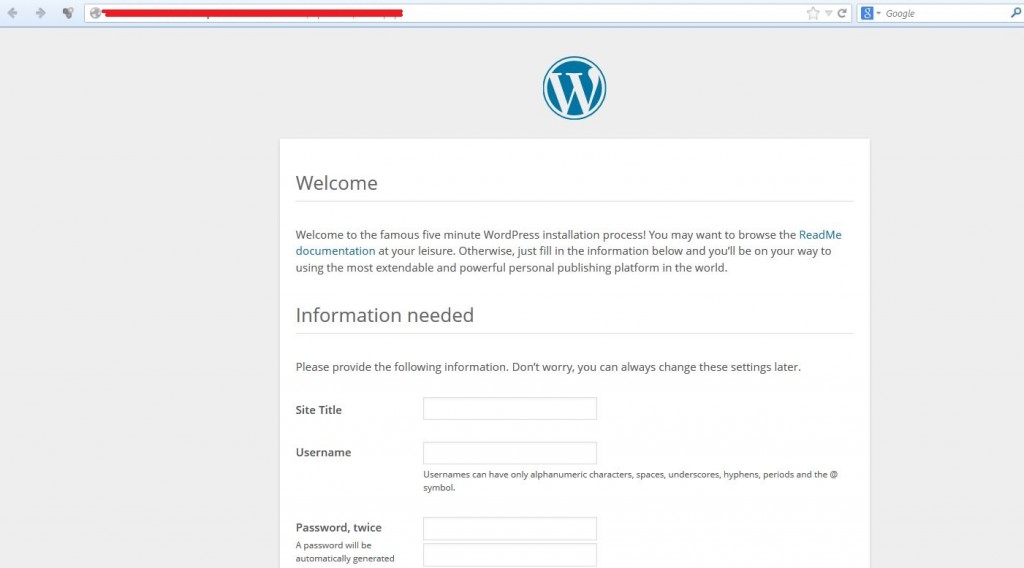
- Now, go to your web browser and enter your public DNS (the one you’ve got from step 27), you should be prompted by this window:

- If you can’t see this page and you saw the famous (error connecting to database) then you’ve made a mistake in step (30) and you’ll need to repeat starting from it.
- If you saw the page, then just enter the site name, username and password and click on the install, when the installation finishes you’ll find your new website and you’re ready to add content and share it with the world.
One might think that the previous steps are just too long, laborious and tedious; then remember two things; first that the toughest step is the first step, second that all of the previous was nothing but copy and paste. Give yourself a nudge, stop procrastinating and try building something. If you don’t know WordPress then you can either start from “How to learn WordPress for free” or from wpeagle as the website has many tutorials for beginners.